Repository
Repository (PRO Feature)
The Repository page connects your Git provider (GitHub or Bitbucket) directly to WordPress, enabling you to review commits, inspect code changes, and monitor CI/CD workflows without leaving the dashboard. It centralizes development visibility and gives both technical and non-technical team members quick access to repository activity.
This feature is available exclusively for PRO users.
Accessing the Repository Page
Navigate to: All DashAI WP → Repository
The interface adjusts depending on whether you authenticate using OAuth or a manual token and depending on the chosen provider (GitHub or Bitbucket).
Authentication Methods
OAuth (Recommended)
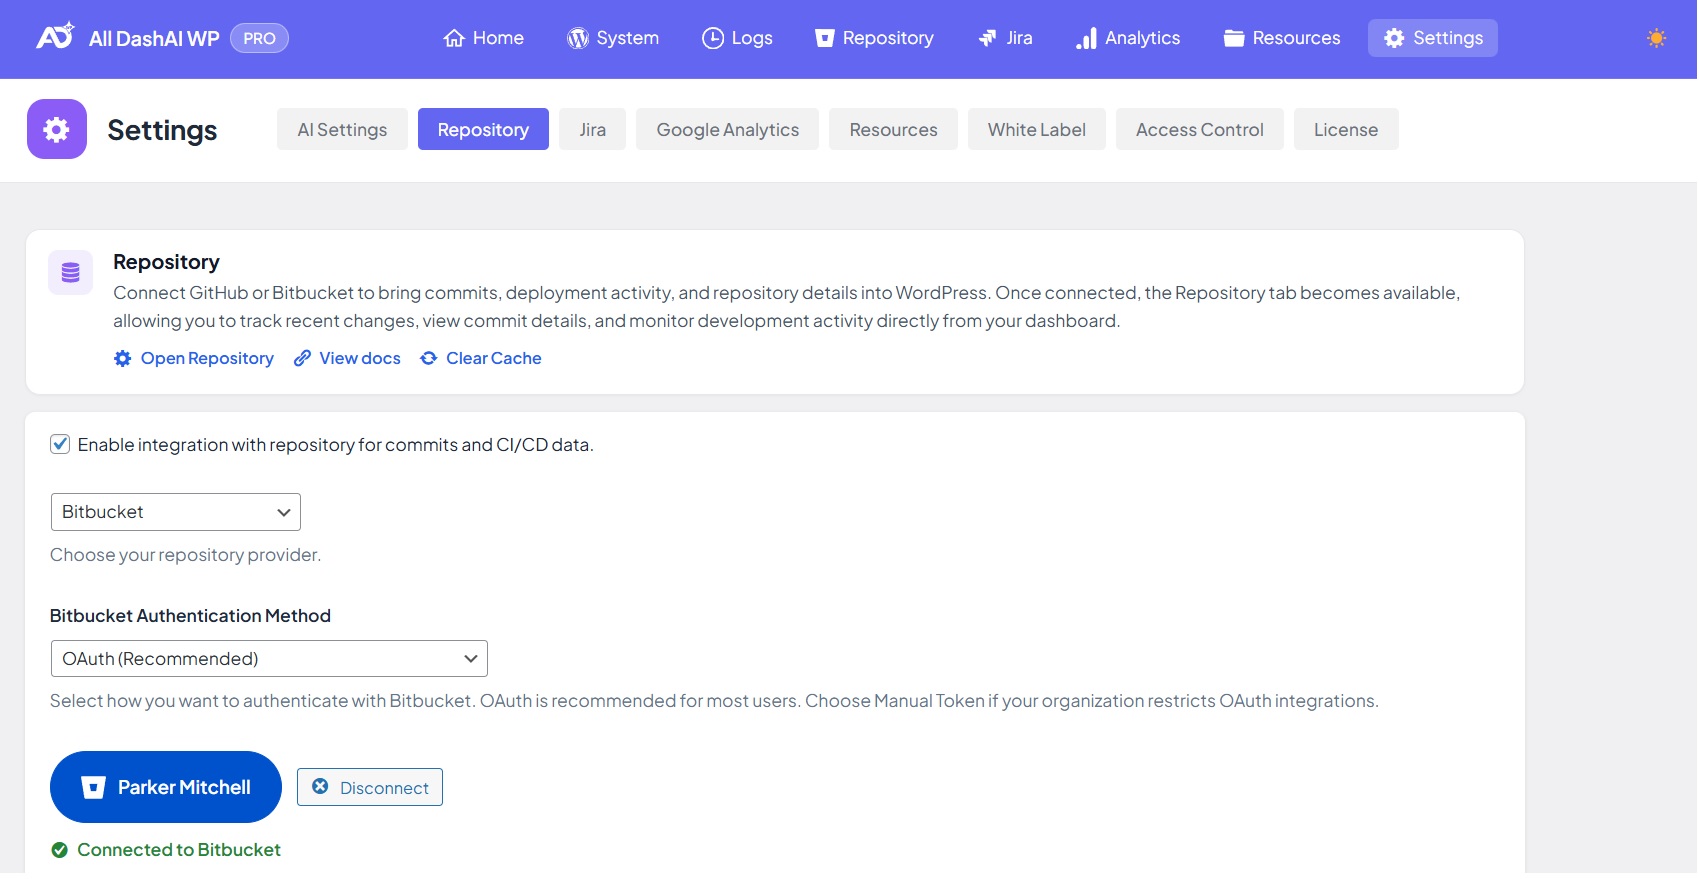
OAuth offers automatic token refresh, better security, and seamless authorization. Tokens are stored securely and refreshed without user interaction.
Supported for:
GitHub OAuth Apps
Bitbucket OAuth Consumers
Manual Token
All DashAI WP supports two authentication methods for GitHub: OAuth and Manual Tokens. OAuth is the recommended option for most users due to automatic token refresh, secure workflow, and simplified authorization. However, certain organizations restrict OAuth integrations, in which case Manual Token authentication becomes necessary.
GitHub currently offers two types of personal access tokens:
Fine-grained Personal Access Tokens
Classic Personal Access Tokens
Both are supported, but they differ in compatibility depending on the repository type and the security policies of the organization.
This section explains when to use each token type and provides detailed setup instructions.
When to Use Fine-Grained Tokens
Fine-grained tokens are recommended when:
You are accessing repositories from your personal GitHub account.
You are working within organizations that allow fine-grained token permissions.
You only need read-only access to public or private repositories under normal GitHub accounts.
Fine-grained tokens may not work when:
The repository belongs to an enterprise or corporate organization.
The organization enforces SAML single sign-on.
The organization restricts fine-grained tokens at the policy level.
The “Repository permissions” section does not appear when creating the token.
In these cases, the GitHub API will return 404 responses even if you have browser access to the repository.
When to Use Classic Tokens (Required for Enterprise Repositories)
Classic personal access tokens are required when:
The repository belongs to enterprise accounts, including WPVIP, Automattic, GitHub Enterprise, and organizations with strict security policies.
Fine-grained tokens do not expose repository permissions.
The organization blocks OAuth but allows PAT Classic.
You need reliable access to private repositories for commit viewing or CI/CD monitoring.
A Classic token with the repo scope grants full read access to all repositories you personally have permission to access, including enterprise-level repositories.
This is the recommended token type for users working with:
WPVIP repositories
Enterprise organizations
Repositories with SAML or policy restrictions
How to Create a GitHub Classic Personal Access Token
Classic tokens provide broad repository access and are the most compatible for enterprise environments.
Step 1: Open the Classic Token Page
https://github.com/settings/tokens/new
Or navigate manually:
GitHub → Settings → Developer settings → Personal access tokens → Tokens (classic) → Generate new token
Step 2: Configure Token Details
Name: alldashaiwp
Expiration: Select a date (recommended: 1 year)
Step 3: Select Required Scopes
Enable the following scope:
repo(grants access to private and public repositories)
This includes:
Access to repository contents
Commit history
Deployment status
Repository metadata
No additional scopes are required unless you need to access organizational membership or GitHub Actions.
Step 4: Generate the Token
Click “Generate token” and copy it immediately.
Step 5: Add Token to All DashAI WP
WordPress → All DashAI WP → Settings → Repository
Paste the token under “GitHub Personal Access Token”.
How to Create a Fine-Grained Personal Access Token (When Applicable)
Fine-grained tokens offer more granular security but are not always compatible with enterprise repositories.
Use these only if:
Accessing your personal repositories
Accessing non-enterprise repositories
Your organization allows fine-grained permissions
Step 1: Create a Fine-Grained Token
https://github.com/settings/personal-access-tokens/new
Step 2: Configure Token Details
Name: alldashaiwp
Expiration: 1 year
Resource owner: Your GitHub username or organization
Step 3: Repository Access
Select one of the following:
Public repositories
All repositories (recommended)
Only selected repositories
Step 4: Permissions
For commit viewing, no additional permissions are required.
Default read-only access is sufficient.
If monitoring CI/CD:
Actions → Read-only
Step 5: Save and Add Token
Paste the token in All DashAI WP → Settings → Repository.
Troubleshooting Token Issues
Issue: “Repository not found”
Cause: Organization restricts fine-grained tokens
Solution: Use a Classic PAT
Issue: “Insufficient permissions”
Cause: Missing repo scope or fine-grained repo permissions
Solution: Recreate token with correct scopes
Issue: OAuth blocked
Cause: Enterprise policy
Solution: Switch to Manual Token → Classic PAT
Issue: Private repositories not appearing
Cause: Fine-grained token missing repository permissions
Solution: Use Classic token with repo scope
Security Best Practices
Always set an expiration date
Use the minimum scopes necessary
Revoke unused tokens
Avoid sharing tokens across applications
Delete tokens immediately if compromised
GitHub Classic tokens can be revoked at:
https://github.com/settings/tokens
Fine-grained tokens can be revoked at:
https://github.com/settings/personal-access-tokens
Bitbucket API Token (Atlassian Account)
Bitbucket uses Atlassian Account API tokens for authentication.
Step 1: Access API Tokens
Go to:
https://id.atlassian.com/manage-profile/security/api-tokens
Or navigate manually:
Atlassian Account → Security → API tokens
Step 2: Create New Token
Click “Create API token”
Enter a label (e.g., alldashaiwp)
Click “Create”
Step 3: Copy and Save Token
Copy the token immediately — it will only be shown once
Store it securely if needed
Paste the token in:
All DashAI WP → Settings → Repository → Bitbucket Token field
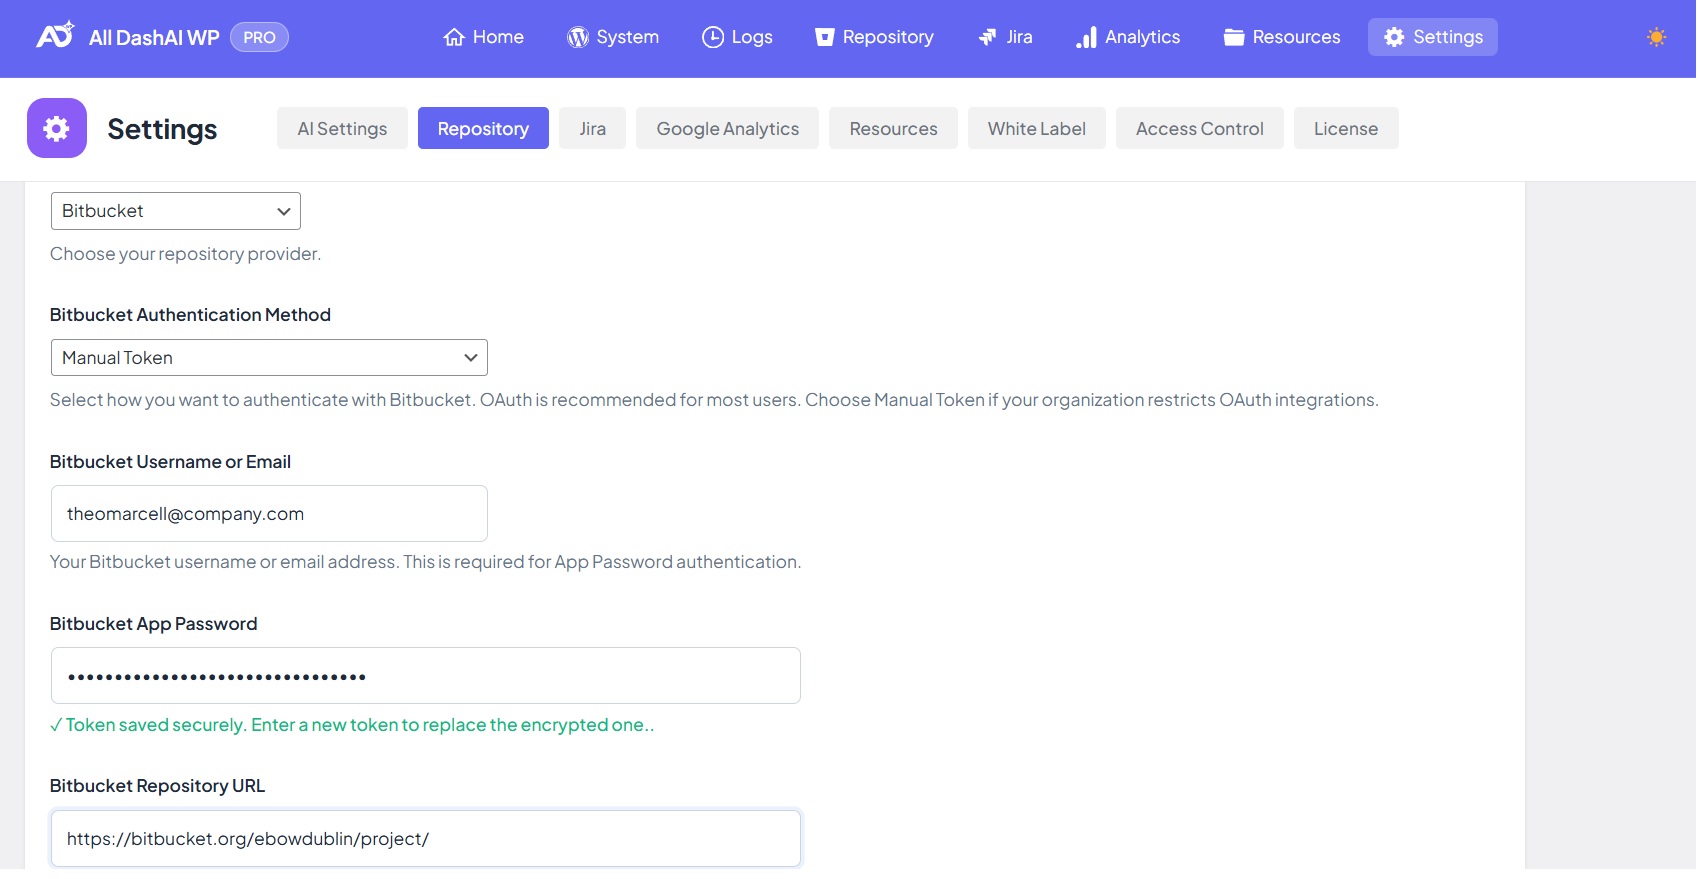
Step 4: Configure in All DashAI WP
For Bitbucket, enter your Atlassian account email in the Username/Email field.
| Field | Value |
|---|---|
| Bitbucket Token | The API token you just created |
| Username/Email | Your Atlassian account email |
Token Security Best Practices
Set expiration dates
Use minimal permissions
Revoke unused tokens
Never share tokens
One token per application
Revoking Tokens
GitHub
Find the token
Click Delete
Bitbucket
Go to https://id.atlassian.com/manage-profile/security/api-tokens
Find the token
Click Revoke
All DashAI WP will auto-detect revoked tokens and prompt for updates.
Troubleshooting Token Issues
| Issue | Solution |
|---|---|
| “Invalid token” | Verify token copied correctly |
| “Insufficient permissions” | Check repository access |
| “Token expired” | Create a new token |
| “Rate limit exceeded” | Wait or use OAuth |
| Cannot see private repos | Use “All repositories” or selected repos |
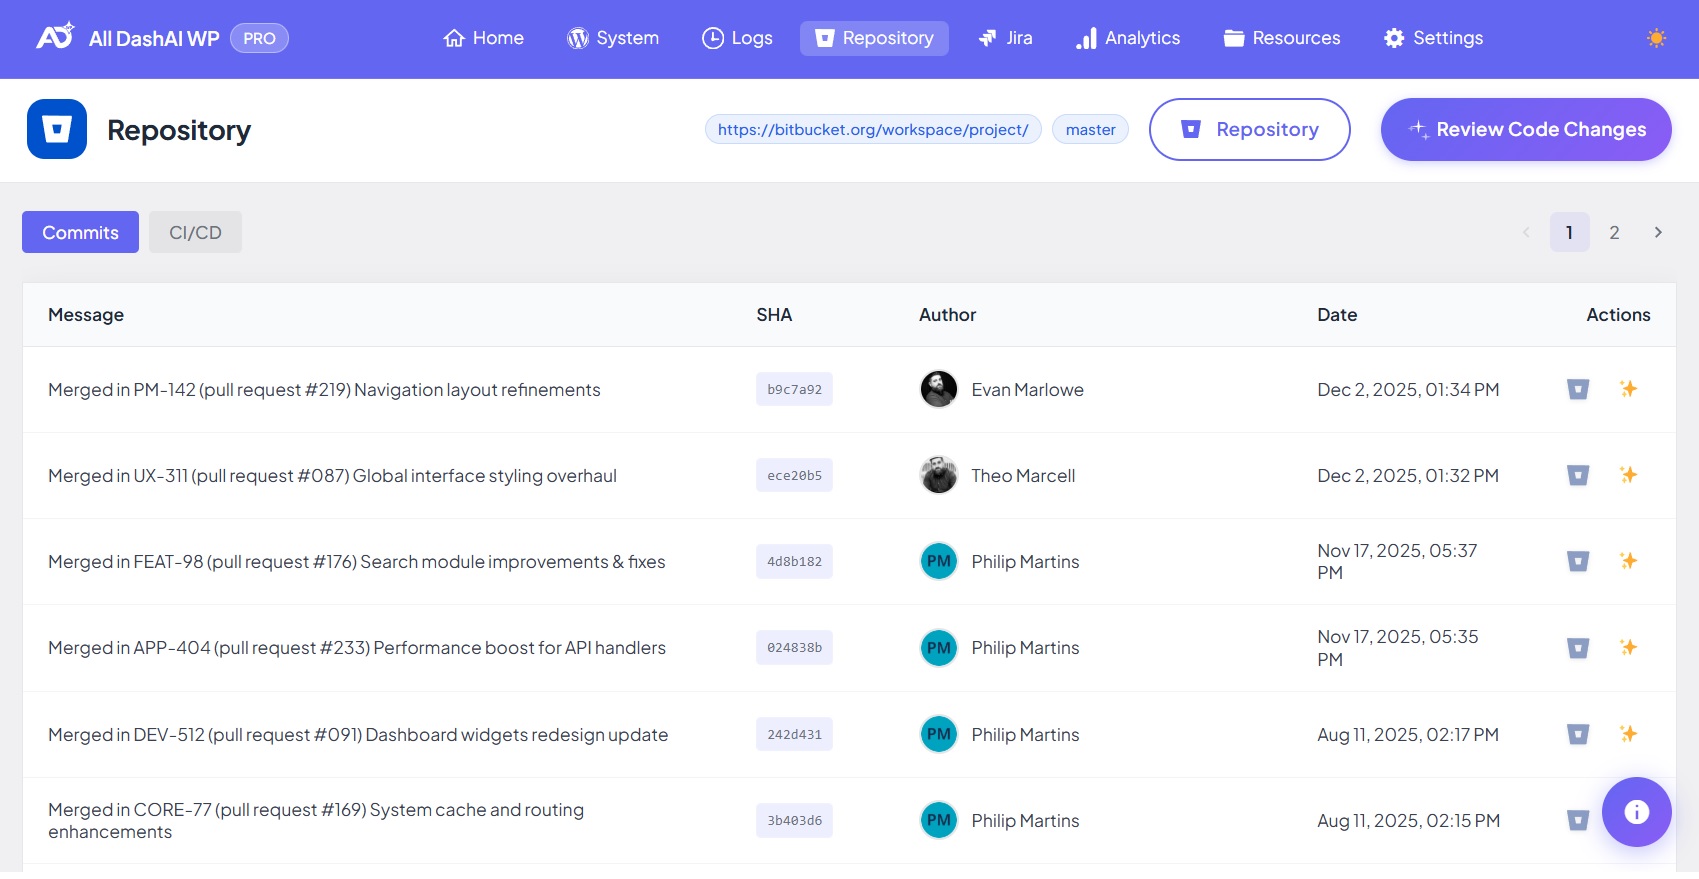
Commit Viewer
The Commit Viewer shows the latest commits for your selected repository and branch.
Unlimited commits with pagination
10 commits per page
SHA, message, author, date
Commit modal
Navigation for historical commits
Commit Detail Modal
Displays:
Full commit message
Author and timestamp
GitHub/Bitbucket link
Modified files
Line additions/removals
AI Code Analysis (optional)
AI Code Analysis
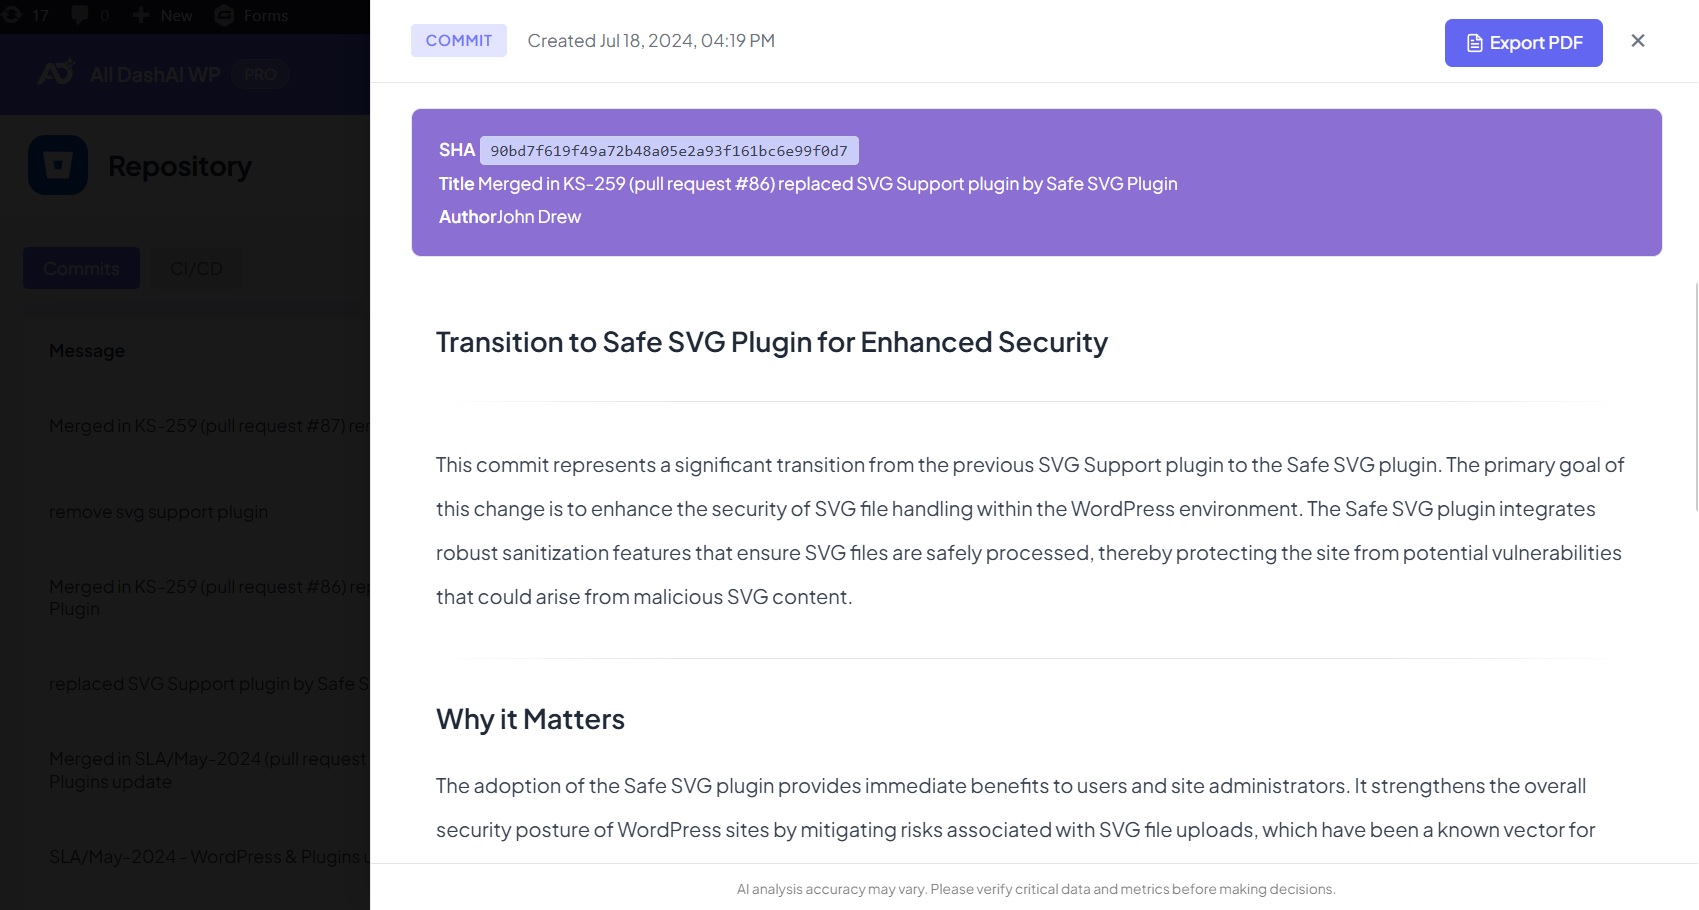
Provides insights such as:
Commit purpose
Risks
Suggestions
Code quality observations
Only selected commit data is processed.
CI/CD Monitoring
Supports:
GitHub Actions
Bitbucket Pipelines
Panel shows:
Build status
Triggering commit
Timestamps
Provider logs
Pagination and Navigation
10 commits per page
URL context persists
Caching
Cache Durations
| Content Type | Duration |
|---|---|
| Commit list | 5 minutes |
| Commit detail | 24 hours |
| CI/CD status | 3 minutes |
Cache clears when:
Repository settings change
User clears cache
TTL expires
Error Handling
Includes clear messages for:
Invalid/expired OAuth tokens
Insufficient permissions
Incorrect repository URL
Rate limits
Security and Privacy
Secure OAuth storage
AES-256-CBC encryption
Nonces on AJAX
Capability checks
Strict sanitization/escaping
AI only processes chosen commit data
Multisite Behavior
Separate configuration per site
Separate cache
Site-specific authentication
Enterprise Repositories and OAuth Restrictions
Some organizations restrict OAuth.
When OAuth Blocking Occurs
Occurs when:
Third-party OAuth disabled
Enterprise policies enforced
OAuth not approved
App requires admin approval
Dashboard detects and guides users.
Available Actions
Switch to Manual Token
Go to Settings → Repository
Change authentication to Manual Token
Enter GitHub Token: https://github.com/settings/tokens
or Bitbucket App Password: https://bitbucket.org/account/settings/app-passwords/
Works instantly.
Message Displayed When OAuth Is Blocked
Title: GitHub Organization “{organization}” has blocked OAuth integrations
Status: OAuth Access Restricted
Actions: Switch to Manual Token, request approval, etc.
Recommended Workflow
Manual Token is the safest approach for Enterprise repositories:
No admin approval required
Works even with OAuth blocked
AES-256 encrypted
Tokens revocable anytime